With copious amounts of yoga asanas to sift through, figuring out the most beneficial poses to perform every day becomes a daunting task. That’s where this handy little list comes in.
Having searched through many yoga poses myself, I was able to narrow them down to just 10 simple, yet extremely beneficial, yoga poses that can easily be performed daily.
Now obviously, you don’t have to perform these every day, but these poses are simple and effective enough that you’ll most likely want to! And the benefits you’ll reap from practicing these poses will have you hooked.
Before we get things started, I wanted to share my criteria for choosing these 10 yoga poses you should do every day.
- Abundance of benefits: All yoga poses have their benefits, but I specifically chose ones that help reduce anxiety and mild depression, improve digestion, help with headaches and insomnia, calm the brain, and stretch and strengthen important muscles like your back, core, arms, and legs.
- Beginner friendly: Each one of these yoga poses can be performed by anyone, no matter how long you’ve been practicing yoga. Some of these poses even have modifications to make them easier.
- Foundational poses: Learning to master simpler, more foundational poses such as Tadasana, Savasana, and Plank Pose, is important. This will give you a better understanding of yoga practices while also preparing you for more difficult poses later on. Not to mention, Plank Pose is crucial for building a strong core, which is vital for almost everything you do.
Top 10 Yoga Poses You Should Do Every Day
The yoga poses shown below are in an order that allows you to easily turn them into a fluent yoga workout if you so please. Or, you can simply pick one or a few that will target your symptoms and quickly enjoy the sweet relief.
So let’s get started!
Mountain Pose (Tadasana)
Mountain Pose, also called Tadasana, is a foundational yoga pose and often serves as a starting position or resting pose. All other standing poses are adapted from Tadasana.
While it may just seem like a normal standing position, there’s actually a lot more to it than that.
Its main purpose is to improve posture, while strengthening your ankles, knees, and thighs. When executed correctly, Mountain Pose utilizes every muscle in the body.
Pretty cool, huh?
Performing Mountain Pose:
To perform Mountain Pose, start with your big toes touching and your heels slightly apart so the outside of your foot is parallel with your mat. Slowly lift and spread your toes apart and then bring them softly back down on the floor.
Begin rocking back and forth and side to side, then slowly reduce your swaying to a standstill. Plant your feet so that your weight is evenly distributed throughout each foot, making sure to ground your feet.
Now lift your ankles to stretch and strengthen the arches of your feet. Making sure your legs are straight, engage your quadriceps (the front part of your thigh) and turn your thighs slightly inwards. Slightly tuck in your tailbone, making sure not to round your lower back and keeping your hips even with the center line of your body. Move your pelvis into its neutral position where your hip bones are pointing forward.
Next, press your shoulder blades into your back and then release them out and down. Lift your sternum toward the ceiling without pushing your ribs forward. Widen your collarbones and hang your arms at your sides. Don’t collapse your chest or round your shoulders.
Lastly, center the crown of your head over the center of your pelvis, keeping the bottom of your chin parallel to the floor. Don’t hang or lean your head forward like you normally do throughout the day. Your head should be right over your open chest, your chest over your pelvis, and your pelvis over your grounded legs.
Stay in Tadasana for 30 seconds to 1 minute.
Note: The above video recommends placing your feet 6-8 inches apart, whereas other sources recommend keeping your big toes together and heels apart. It’s the yogi’s choice, so do what feels best for you.
Standing Forward Bend (Uttanasana)
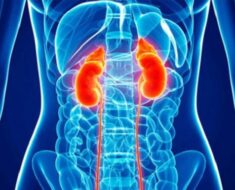
Also known as Uttanasana, Standing Forward Bend is the perfect stretch for tight hamstrings, calves, and even hips. At the same time, it strengthens the knees and thighs while also stimulating the liver and kidneys and improving digestion.
Perhaps most importantly, Uttanasana calms the brain and aids in relieving stress and mild depression.
So needless to say, practicing this great yoga pose daily will not disappoint.
Performing Standing Forward Bend:
Standing in Tadasana, place your hands on your hips and make sure your feet are planted firmly on the ground and your abdominal muscles are engaged. Exhale and bend from the hips, not the waist. The purpose of forward bends is to focus on lengthening the front torso as you move into position.
Keeping your legs as straight as possible without causing discomfort, bring your fingers or palms to the floor slightly beside or in front of you. If it’s difficult to reach the floor, put your palms on your ankles or fold your arms over each other and hold your elbows. Press your heels into the ground and lift your sit bones toward the ceiling while turning your thighs slightly inward.
Each time you inhale, slightly lift and lengthen your torso. On each exhale, move deeper into the bend so your chest is closer to your legs. Once you’re done with this pose, don’t roll your spine on the way back up. Instead, place your hands on your hips, press your tailbone down into your pelvis, and slowly come up while maintaining a long torso. It’s essentially doing the pose in reverse.
Stay in Uttanasana for 30 seconds to 1 minute.
Downward-Facing Dog (Adho Mukha Svanasana)
Downward-Facing Dog is a very common yoga pose that’s incorporated in almost every yoga routine and it’s for good reason.
Incorporating Downward Dog into your daily yoga routine will stretch and strengthen your entire body, with emphasis on the arms and legs. Another great benefit of this pose is that it helps improve digestion, which is something I’m sure we all can get behind.
While it’s a bit of a challenging pose, proper form makes all the difference.
Performing Downward-Facing Dog:
Starting on your hands and knees, tuck your toes under your feet and lift up your legs and hips. Lean into your heals to shift the weight to your legs. This will reduce any stress and discomfort on your wrists.
Move your feet to the edge of your mat, making sure to send the weight to your legs. This will force your legs and arms to become straight, which is what you want. Now slowly lift one heel off the mat and push the other heel to the floor, alternating each foot every few seconds. You will feel a nice stretch in your calves and hamstrings.
Perform Downward Dog for 30 seconds to 1 minute.
Plank
The Plank is the perfect pose to help you master more difficult arm balances like Downward-Facing Dog, Crane-Crow Pose, and the Four-Limbed Staff Pose.
Performing this pose helps strengthen your arms, spine, and wrists, as well as tones your abdominal muscles.
As we all know, a strong core is the basis for a strong, capable body. Pretty much everything you do and every task you perform utilizes your core which is why it’s so important you build it up.
And what better way to do so than performing a plank on a daily basis? In no time at all, you’ll have a nice strong core, arms, wrists, and spine that will enable you to perform more complex poses and reduce pain and injury during daily tasks.
Performing Plank Pose:
Starting in Downward-Facing Dog, inhale and draw your torso forward until your arms are perpendicular to the floor. Your shoulders should be directly over your wrists with your torso parallel to the floor.
Look down at the floor, making sure to keep your neck aligned with your straight spine. Now draw your abdominal muscles in to prevent your hips from sagging. You also don’t want your hips to rise up, so focus on keeping your core tight and your back parallel to the floor.
Perform the plank for 30 seconds to 1 minute, remembering to breathe.
Cobra Pose (Bhujangasana)
By opening the heart, practicing the Cobra Pose can provide you with anxiety relief and stress reduction. As with many other great yoga poses, the Cobra Pose can improve digestion.
Other great benefits of this pose include reduced neck and back pain and a stronger spine, glutes, thighs, arms, and shoulders. Not to mention it’s a great way to stretch your abdomen, chest, lungs, and shoulders.
Performing Cobra Pose:
Start by laying facedown on the floor. Stretch your legs back and place the tops of your feet on the floor. Place your hands on the floor directly below your shoulders and hug your elbows to your sides.
Now press your hands, thighs, and the tops of your feet into the floor. Begin straightening your arms and slowly send your chest forward and up, making sure to keep the back of your neck long.
Broaden your collarbones while rolling your shoulders back and down. Avoid pushing your front ribs forward, as this will harden your lower back.
Hold this pose for 15-30 seconds, then slowly release back down to the floor.
Child’s Pose (Balasana)
Child’s Pose, or Balasana, is a delightfully restful pose often sequenced between more difficult poses. However, there’s more to it than that.
Performing Balasana stretches your ankles, hips, and thighs and can also relieve back and neck pain with head support. It’s also known to help relieve stress and fatigue while also calming the brain.
Trust me, this is a pose you’ll fall in love with.
Performing Child’s Pose:
Begin on your knees with your big toes touching and your knees wide apart. Tuck your toes and allow your glutes to rest on your feet.
Now crawl your fingertips forward so your arms are extended in front of you on the floor. If your nose is pressing uncomfortably on the floor, you can turn your head to either side to relieve some pressure.
Focus on taking deep breaths and just relaxing.
Stay in Child’s Pose for 30 seconds to 1 minute.
Cat-Cow Pose
The Cat-Cow Pose combines, you guessed it, both the Cat and the Cow poses. The difference between these two poses is the arch of your back.
In the Cow Pose, your back is arched in the shape of a half-moon while the Cat Pose requires your back to be arched the opposite way, similar to a stretching cat. Pairing these two poses together creates the perfect spinal warmup.
This is a great yoga pose to perform, as many people suffer from back and neck pain and this can help relieve some of it.
Performing Cat-Cow Pose:
Starting on your hands and knees, place your hands and wrists directly under your shoulders with your knees directly under your hips.
Inhale and drop your stomach towards the mat. Slowly lift your neck and chin so you are gazing towards the ceiling, being careful not to strain your neck. This is Cow Pose.
Now, exhale while pulling your belly button towards your spine and rounding your back toward the ceiling. Look towards the ground without bringing your chin to your chest. You are now in Cat Pose.
Repeat these movements for 30 seconds to 1 minute.
Bridge Pose (Setu Bandha Sarvangasana)
Reduced anxiety, backaches, fatigue, headaches, and insomnia are just some of the many benefits Bridge Pose has to offer.
This yoga pose is also great for stretching the chest, neck and spine, while also improving digestion and stimulating abdominal organs, lungs, and the thyroid.
Performing Bridge Pose:
Laying on your back, bend your knees and place your feet on the floor. Move your heels as close to your sitting bones as possible. Press your feet and arms firmly into the floor and exhaling, lift your hips toward the ceiling.
Making sure not to squeeze your glutes, draw your tailbone toward your pubic bone. Your thighs should be parallel to one another, as should your feet. Your weight should be evenly distributed between all four corners of both feet.
Now roll your shoulders back underneath your body. With your arms extended under you pelvis, bring your hands together. Reach your arms as far forward as possible while slightly lifting your chin away from your sternum.
Stay in Bridge Pose for 30 seconds to 1 minute.
To release, bring your arms to your sides and slowly roll your spine back down to the floor.
Legs-Up-the-Wall Pose (Viparita Karani)
Viparita Karani, also known as Legs-Up-the-Wall Pose, is commonly thought of as having the power to cure pretty much anything you encounter.
From anxiety to headaches and migraines to insomnia and more, this pose can provide relief for all. It’s a no-brainer to add this yoga pose into your daily yoga routine or maybe even just before going to bed.
Performing Legs-Up-the-Wall Pose:
Grab a folded blanket or towel and place it near the wall. Sitting close to the wall, move into a laying position where your butt is against the wall and your legs are parallel to the wall and touching it.
You may need to readjust the blanket so it’s positioned under the arch of your back. There should be a gap between the blanket and the wall to allow a place for your hip sockets to drop into.
You can modify this position by slightly bending your knees and placing your arms either at your side or on your chest.
Stay in this pose for 5-10 minutes.
Corpse Pose (Savasana)
Generally a pose reserved for the end of a yoga session, Savasana, also known as Corpse Pose, is the ultimate relaxation pose.
But don’t let that fool you.
Learning to relieve the tension in your body and completely let go is challenging to say the least, which is why Savasana is such an important yoga pose to practice daily.
By letting go, you allow your muscles worked during your routine to relax while also calming the brain and reducing stress, headaches, fatigue, and even insomnia.
I’m already getting relaxed just thinking about it, so lets get to it!
Performing Corpse Pose:
While laying flat on your back, allow your arms, legs, and feet to relax on the floor. Your feet should fall gently to their sides while your arms are next to your torso, palms facing up.
Your goal is to relax any tense muscles. Taking a deep breath, focus on the unrelaxed area, and exhale to release any tension in the muscle. Focus on taking deep breaths and just letting loose.
Stay in Savasana for 1 minute.
Practicing yoga daily has numerous health benefits that anyone and everyone can benefit from. All you need are 10-15 minutes, comfy clothes, and a relaxing location and you’ll be reaping the benefits in no time!